First of all, don't forget to ask your sysadmin to setup autodiscover, as it will make the process of setting up Thunderbird much easier.
Below, step by step tutorials according to the Outlook version used, which you can usually check when opening Outlook or in the Help menu/About. There's also a web site website with a generic Outlook setup which can be useful, so you can view screen shotsscreenshots.
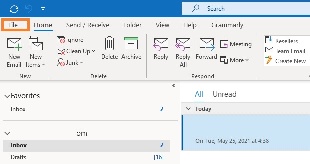
Also notice that if this is the first time you open Outlook since its installinstallation, a window will immediately pop up asking you to setup set up your email account. Click yes and proceed and follow our instructions starting with a section in which you start typing in your account data.
Finally, as per our tests, sent items and trash are automatically saved in IMAP folders, except in older Outlook 2003. Nonetheless, information about this is available for Sent Items and Trash, specially especially useful if your Outlook is not in English and you want to manually define folders used for these base folders. Notice that our WebMail Webmail automatically decodes the english English default names (Sent, Trash, Drafts, Spam) so that it shows them in the language in which you accessed WebMailWebmail. In some cases, however, it might me be required to change folder mappings in WebMailWebmail, if Outlook does not do this conversion automatically, besides mapping the localized names in your Outlook.
Outlook 2013/2010:
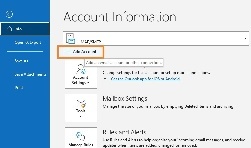
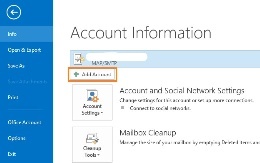
- Click on the File menu and it shall show you the Info tab
- Click on + Add Account
- Type in your full name, e-mail address and password and click on Next
- Click on Allow when asked about autodiscover.xml
- Click on Finish
| Info |
|---|
| Depending on the size of your mailbox and your Internet speed, Outlook might take from a few hours to a few days to synchronize the mailbox and build the local PST file. |
| Note |
|---|
Note that Outlook will automatically setup set up the account as IMAP. If you want to set up the account as POP, you have to setup set up the account manually. IMAP is recommended, as it´s a protocol made to support several devices accessing one same account, with all folders synced at our server, which also guarantees that our backups will be executed. |
Outlook 365
| Info |
|---|
Outlook 2007:
Go to Tools -> Account Settings and click on New
Click on Next
Enter the user's full name, his e-mail address and password. Click on Next
Outlook will search for the web service...
Allow autodiscover.emailarray.com/AutoDiscover/AutoDiscover.xml to configure the client.
The account is now configured. Click on Finish
| Info |
|---|
If you're annoyed by the fact that Outlook, by default, puts a line (strikethrough) in deleted e-mails, see this FAQ. |
Outlook 2003:
| Unfortunately, this version of Outlook doesn't support Autodiscover for IMAP accounts anymore. |
- Click on the File menu
- Click on + Add Account
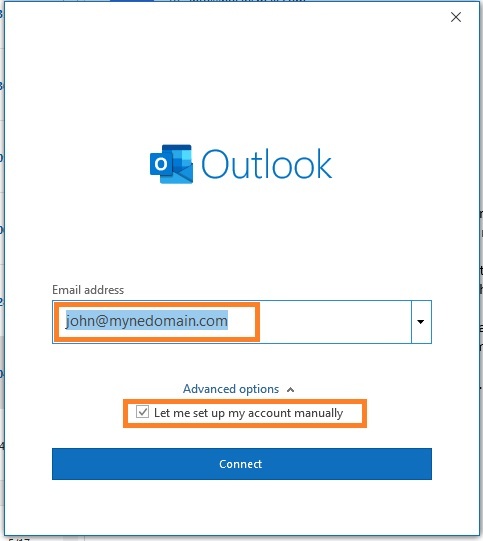
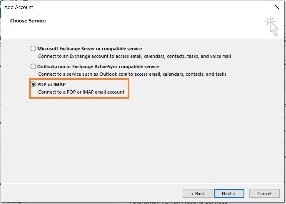
- Fill in your full email address and select the option Let me set up my account manually.
- Click on Next.
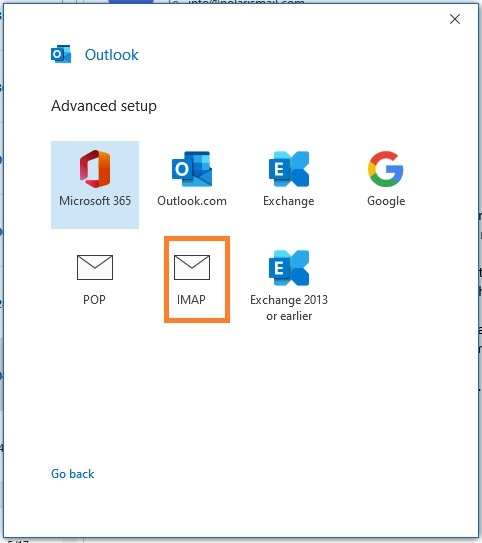
- Select IMAP from the list of account types.
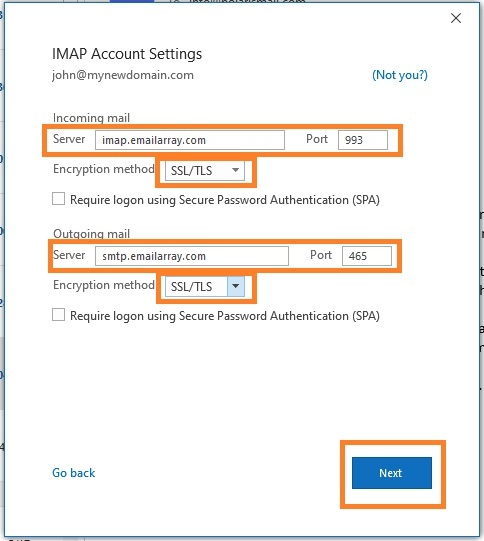
- Fill in server information from the Server & Ports page
- Click on Next
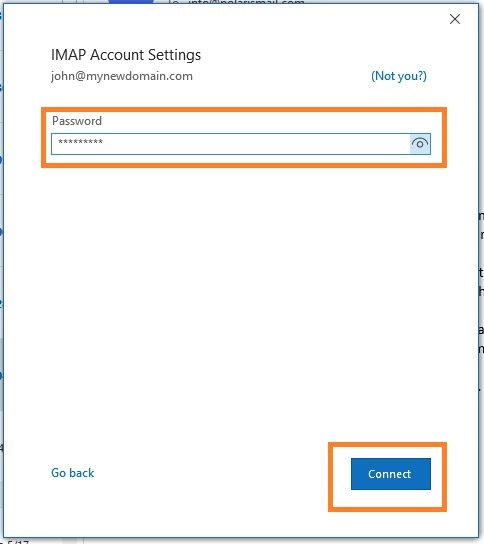
- Fill in your existing password for your email address and click on Connect
- The setup is completed. The message Account successfully added will show and Outlook will begin synchronizing the account.
| Info |
|---|
| Depending on the size of your mailbox and your Internet speed, Outlook might take from a few hours to a few days to synchronize the mailbox and build the local PST file. |
Outlook 2013/2010:
- Click on the File menu
- Click on + Add Account
- Select POP or IMAP
- Option 1: this version of Outlook supports Autodiscover for IMAP accounts if you have setup Autodicover in your DNS.
- Type in your full name, e-mail address, and password
- Access Tools -> E-Mail Accounts
- The E-mail Accounts wizard will open
- Select Add a new e-mail account and click on Next
- Select IMAP (or POP, if you prefer)
- and click on Next
- Click on Allow when asked about autodiscover.xml
- Click on Finish
- Option 2: If you don't get an alert about autodiscover, setup Incoming and Outgoing mail servers manually, as per our servers & ports page (imap.emailarray.com and smtp.emailarray.com)
- In the username field type in your full e-mail address
- Click on the More Settings button and in the Outgoing Server tab, mark the checkbox for "My outgoing SMTP server requires authentication"
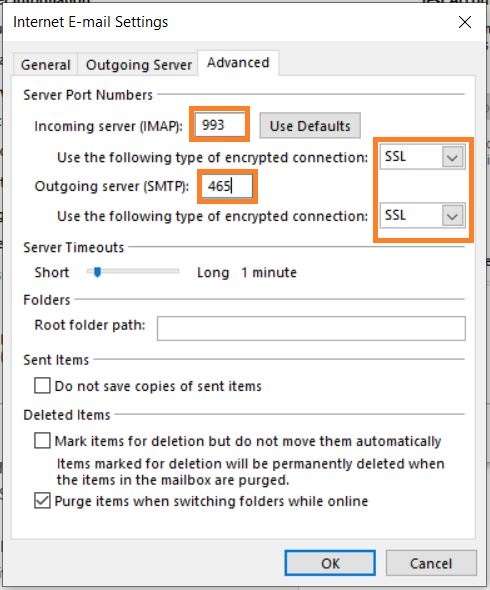
- On the Advanced tab, check ports, for IMAP with SSL checkbox enabled, use port 995 and for SMTP with SSL, use 465
- Click on OK to close configuration windows
- have Autodicover
- select Manual setup and click on Next.
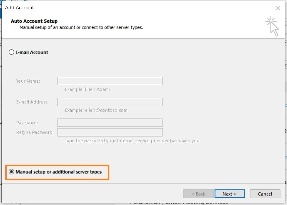
- Type in your full name, e-mail address, and password
- Fill in server information from the Server & Ports page
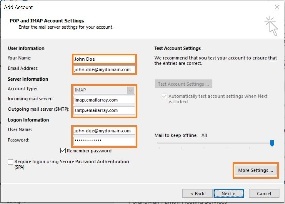
- Click on More Settings.
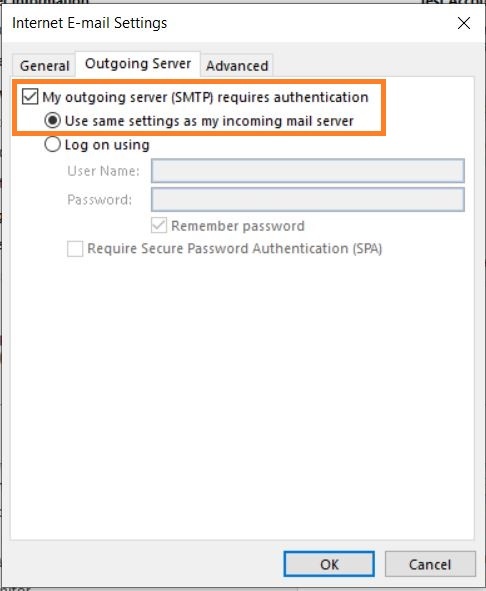
- Select My outgoing server (SMTP) requires authentication and Use same settings as my incoming mail server.
- Click on the Advanced tab
- Verify the ports are correct and SSL is selected.
- Click on OK. Click on Next to finish the setup.
| Info |
|---|
| Depending on the size of your mailbox and your Internet speed, Outlook might take from a few hours to a few days to synchronize the mailbox and build the local PST file |
| Info |
| Outlook 2003 will not store sent emails in IMAP's sent items folder. For a workaround, either upgrade to a newer Outlook or check this FAQ. Setting up trash to use IMAP is much more complicated in Outlook 2003, requiring macros, etc., so it's suggested to upgrade to a newer Outlook. |