Versions Compared

Key

  • This line was added.
  • This line was removed.
  • Formatting was changed.


Info
titleDNS Updates

It might take some time to see the changes in your DNS

...

based on your provider and domain settings.

1. MX Records


The first step in configuring your DNS is updating your MX records.

MX records tell the world which server should receive the e-mails

...

sent to your domain

...

and deliver

...

them to the specified e-mail provider, straight to your mailbox. You can usually

...

edit the MX records for your domain from the same Control Panel you use for managing your DNS. You can safely keep your website hosted with another provider and only use our hosting services for the e-mail.

You should first remove all other MX records and then add the following, with the specified preference (the Host value is usually '@'):

...

Name

...

Preference

TypeHost*

Points to

Priority / Preference

MX@

mx.emailarray.com

      5

MX@

mx2.emailarray.com

     10


Note
titleImportant

It is not recommended to create CNAME records within your domain that point to EmailArray MX records and

...

use that CNAME as your MX records.


2. Webmail Record

...


To access your webmail

...

using a custom URL, you must configure CNAME records within your domain for the webmail host.

You must create:


Type

...

HOST

...

Forwards to

Points to

Your Webmail URL will be
CNAME

webmail

webredirect.emailarray.com

webmail.<yourdomain.com>

...

webmail.<yourdomain.com>

...


3. SPF Record

...


The SPF record is necessary, so your e-mail is not marked as Spam. The SPF will help with your

...

e-mail deliverability because

...

it specifies a list of authorized hosts that can send e-mails on behalf of a domain.

...

First, check for any existing TXT records with SPF.

If you don't have an existing SPF record, you must add a TXT record with the following value (the host value is

...

usually '@'):

Type

HOST

TXT Value

TXT

@

v=spf1 include:emailarray.com -all


If you have an SPF record, you should edit it and insert before the final -all directive, the following value: include:emailarray.com


4. DKIM Records

...


To improve e-mail deliverability, you should enable DKIM for your domain from

...

your Admin Panel and then add the records to your DNS.

DKIM is an

...

e-mail authentication method designed to detect forged sender addresses in

...

e-mails, a technique often used in phishing and

...

e-mail spam (Wikipedia).

To enable DKIM for your domain:

  • Go to the Admin Panel.

  • Log in using your Admin username and password.
  • Click on Domains in the menu.
  • Click on the DKIM icon next to the domain you wish to activate DKIM for
  • In the new window, switch the Enable option to Yes. This will generate your DKIM record.
  • Update your DNS to include the generated DKIM record as TXT record (use the Host value for Host and the Key value for TXT Value).
  • Note it might take some time to propagate in the DNS.

5. Autodiscover Records (optional)

...


To simplify the configuration of modern e-mail clients such as Outlook and Thunderbird, as well as all your mobile devices,

...

you can now use

...

the Autodiscover & Autoconfig web services to

...

configure these clients automatically. You have to add two *A*

...

records in the DNS for your domain:


Basic and Enhanced Accounts:

A record hostname

Points to

autodiscover.<yourdomain.com>

69.28.212.195

autoconfig.<yourdomain.com>

69.28.212.195


Exchange Accounts:

A record hostname

Points to

autodiscover.<yourdomain.com>

69.172.250.30

autoconfig.<yourdomain.com>

69.172.250.30

Tip

Visit the "Autodiscover & Autoconfig" page for more information.


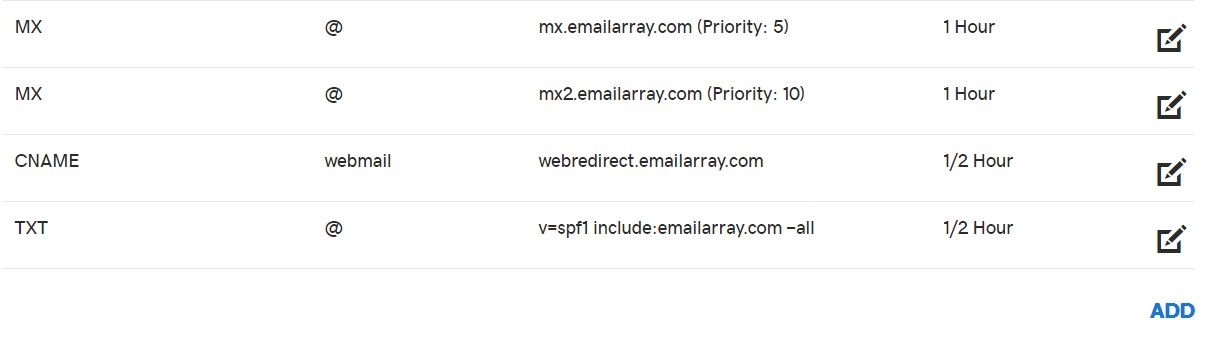
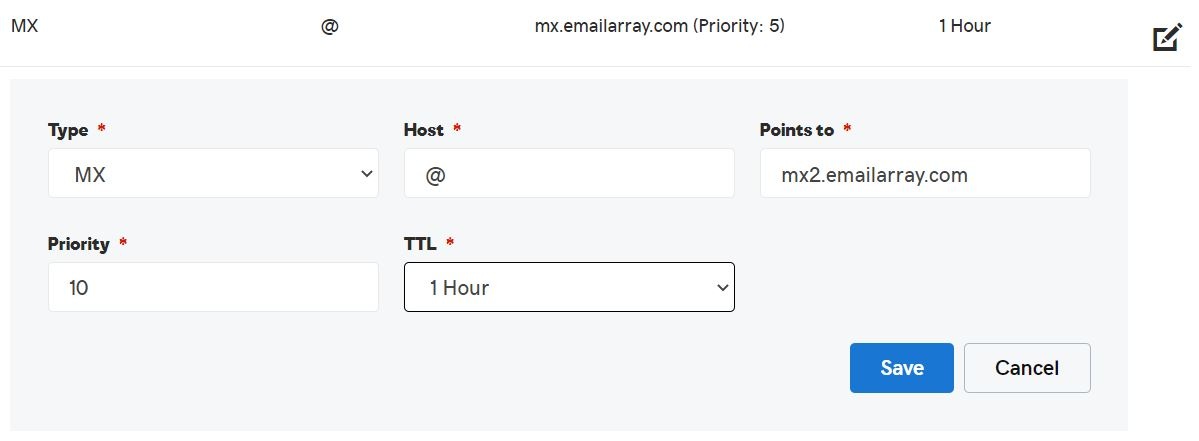
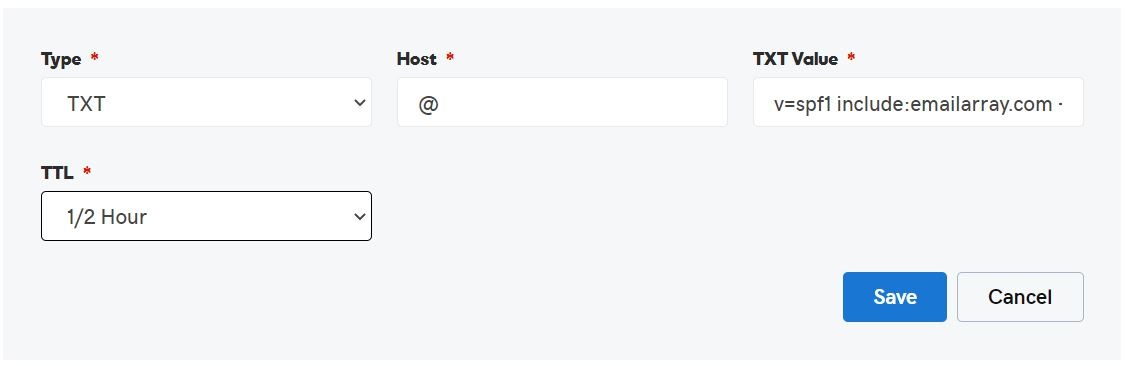
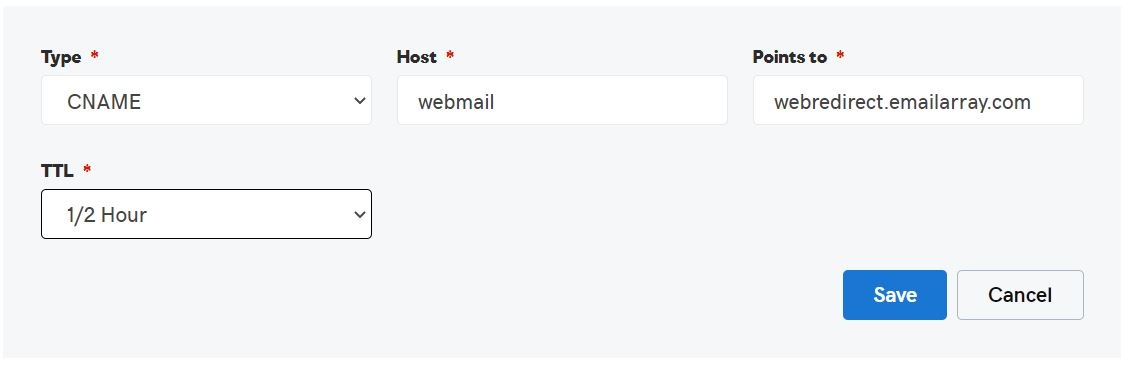
Example Setup in GoDaddy:


Image Modified

Image Modified

Image Modified

Image Modified


Panel
borderColor#efefef
bgColor#fefefe
titleColor#ffffff
borderWidth1
titleBGColor#494949
borderStylesolid
titleOn this page

Table of Contents
minLevel2
stylenone